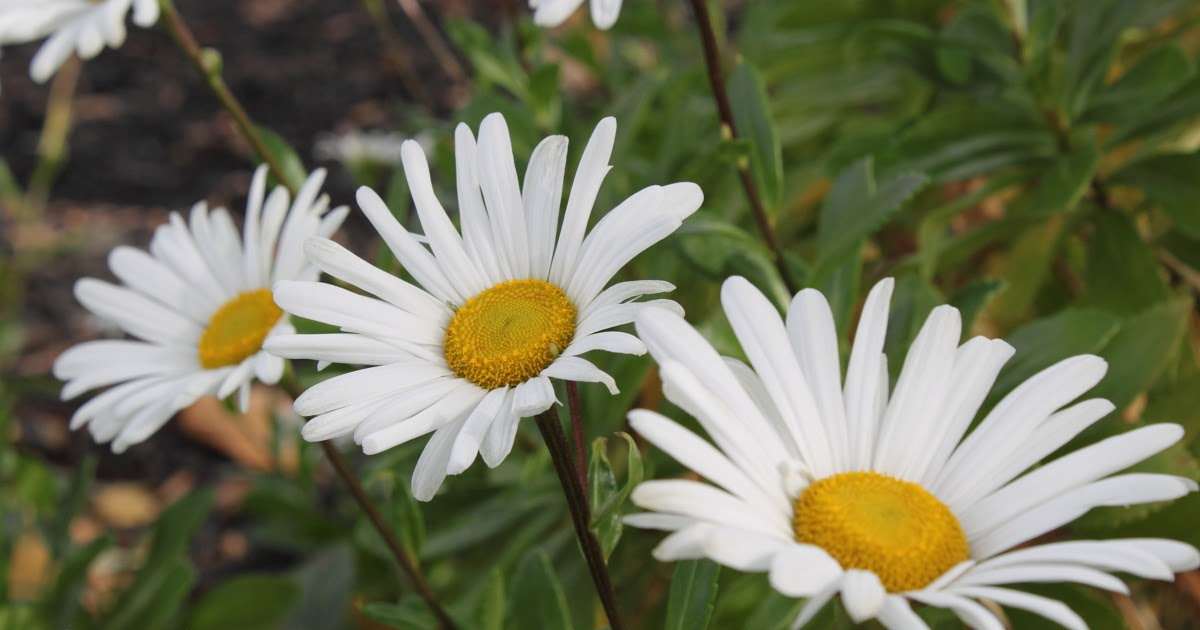
Montauk Daisy (Nipponanthemum nipponicum), also known as Nippon Daisy, is a hardy perennial beloved for its bright white blooms that appear late in the season, often extending the beauty of the garden into fall. Native to coastal areas of Japan, this robust plant thrives in well-drained soil and full sun, making it an excellent choice for various garden settings. Montauk Daisies are appreciated for their drought tolerance, making them low-maintenance and easy to grow just like Manjula Pothos. With proper care, propagation, pruning, and seeding techniques, gardeners can enjoy these stunning flowers year after year, adding vibrant color to their autumn landscapes.
| Common Names | Nippon daisy, Montauk daisy |
| Botanical Name | Nipponanthemum nipponicum |
| Family | Asteraceae |
| Plant Type | Perennial, herbaceous |
| Mature Size | 18-36 in. tall, 18-36 in. wide |
| Sun Exposure | Full, partial |
| Soil Type | Well-drained |
| Soil pH | Acidic |
| Bloom Time | Summer, fall |
| Flower Color | White |
| Hardiness Zones | 5-9 (USDA) |
| Native Area | Asia |
How To Grow & Care Montauk Daisy?
Following are ways to grow and care for Montauk Daisy easily:

Planting Montauk Daisy
Montauk Daisy, also known as Nipponanthemum nipponicum, thrives in well-drained soil and full sun. Choose a location that receives at least six hours of sunlight daily. Plant in early spring or fall, spacing plants about 2 to 3 feet apart to allow for proper air circulation. Dig a hole twice as wide and the same depth as the root ball, and mix in compost to enrich the soil. Place the plant in the hole, backfill with soil, and water thoroughly. Mulch around the base to retain moisture and suppress weeds, ensuring not to cover the crown.
Watering Montauk Daisy
Montauk Daisies prefer moderate watering, especially during their first growing season. Water deeply once a week, allowing the soil to dry out between waterings. Overwatering can lead to root rot, so ensure the soil is well-drained. During hot, dry periods, increase watering frequency but avoid waterlogging. Established plants are more drought-tolerant and require less frequent watering. Inconsistent watering can stress the plants, leading to fewer blooms. Using a soaker hose or drip irrigation system can help deliver water directly to the roots, promoting healthier growth and more abundant flowering.
Fertilizing Montauk Daisy
Montauk Daisies benefit from light fertilization. In early spring, apply a balanced, slow-release fertilizer to provide essential nutrients for the growing season. Avoid high-nitrogen fertilizers, as they can lead to excessive foliage growth with fewer flowers. Compost or well-rotted manure can also be used to improve soil fertility. Reapply a light dose of fertilizer in midsummer to encourage robust blooming in the fall. Over-fertilization can harm the plant, so follow the recommended rates on the fertilizer package. Regular soil testing can help determine specific nutrient needs and prevent over-fertilization.
Pruning Montauk Daisy
Pruning is essential for maintaining the shape and vigor of Montauk Daisies. In late spring or early summer, pinch back the tips of new growth to encourage bushier plants and more blooms. This practice helps prevent the plants from becoming leggy. After the first frost, cut back the stems to about 3 inches above the ground to prepare for winter. Removing spent flowers during the blooming season can promote continuous flowering it has the same characteristic of blooming as Bachelor Buttons. Pruning also helps improve air circulation, reducing the risk of fungal diseases. Sterilize pruning tools before use to prevent the spread of disease.
Overwintering Montauk Daisy
Montauk Daisies are hardy perennials that can withstand cold winters with proper care. In late fall, after the first frost, cut back the stems to about 3 inches above the ground. Apply a thick layer of mulch around the base to protect the roots from freezing temperatures. This insulation helps retain soil moisture and prevents heaving during freeze-thaw cycles. In areas with severe winters, consider additional protection, such as covering with a frost blanket. Avoid heavy fertilization late in the season, as it can promote tender growth susceptible to frost damage. Remove mulch in early spring as temperatures warm.
How To Propagate Montauk Daisy?
Get a complete guide to propagate Montauk Daisy and propagate it easily anywhere:
Selecting Healthy Cuttings
Choose healthy, non-flowering stems from an established Montauk Daisy plant. The best time for taking cuttings is in late spring or early summer. Ensure the selected stems are about 4-6 inches long and free from diseases or pests. Use sharp, sterilized scissors or pruning shears to make a clean cut just below a leaf node. Remove the lower leaves, leaving only a few at the top. This helps the cutting focus its energy on root development rather than maintaining foliage. Healthy cuttings are crucial for successful propagation and vigorous new growth.
Preparing the Cuttings
After selecting healthy cuttings, dip the cut end into rooting hormone powder to encourage root development. This step is optional but can significantly improve success rates. Fill a small pot with a well-draining rooting medium, such as a mix of perlite and peat moss. Make a small hole in the medium with a pencil or your finger, and gently insert the cutting, ensuring at least one leaf node is buried. Firm the medium around the cutting to provide support and eliminate air pockets. Water the medium lightly to settle it around the cutting.
Planting the Cuttings
Plant the prepared cuttings in the rooting medium, ensuring they are spaced apart to prevent overcrowding and improve air circulation. Place the pot in a location with bright, indirect sunlight to avoid direct exposure, which can stress the cuttings. Maintain a consistent level of moisture in the rooting medium without making it waterlogged. Covering the pot with a plastic bag or a clear plastic dome can create a humid environment that encourages root growth. Ensure the cover does not touch the cuttings to prevent mold and mildew formation.
Caring for the Cuttings
Monitor the cuttings regularly, ensuring the rooting medium remains moist but not soggy. Remove the plastic cover for a few minutes each day to allow air exchange and prevent fungal issues. Within a few weeks, check for root development by gently tugging on the cuttings. Once roots are established, gradually acclimate the new plants to outdoor conditions by increasing their exposure to sunlight and air. Transplant them into individual pots with well-draining soil or directly into the garden once they show robust growth. Continue to water regularly and protect them from harsh weather until fully established.
Quick Steps Grow Montauk Daisies from Seeds
- Seed Selection: Purchase high-quality Montauk daisy seeds from a reputable supplier. Check the packaging for any specific instructions or notes about the seeds.
- Soil Preparation: Montauk daisies prefer well-draining soil with a neutral to slightly alkaline pH. Prepare your planting area by loosening the soil and removing any weeds or debris.
- Sowing Seeds:
- Indoors: Start seeds indoors 6-8 weeks before the last frost. Fill seed trays or pots with seed-starting mix, and sow the seeds on the surface of the soil. Lightly press them into the soil but do not cover them completely, as they need light to germinate.
- Outdoors: After the last frost, you can also sow seeds directly outdoors. Scatter the seeds on the prepared soil and lightly press them down.
- Watering: Keep the soil consistently moist but not waterlogged. Use a spray bottle to mist the soil if you are starting seeds indoors to avoid displacing them.
- Light: Montauk daisy seeds need light to germinate. Place the seed trays or pots in a bright location with indirect sunlight. If starting indoors, you can use a grow light to ensure they receive adequate light.
- Temperature: Maintain a temperature of 65-70°F (18-21°C) for optimal germination.
- Germination Time: Montauk daisy seeds typically germinate within 14-21 days.
- Transplanting: Once the seedlings have developed a few sets of true leaves and the danger of frost has passed, you can transplant them outdoors. Space the plants about 18-24 inches apart to give them room to grow.
Montauk Daisy Pests and Diseases
Here are some common pests and diseases that can affect Montauk Daisies and how to manage them:
Pests
- Aphids
- Symptoms: Curling, yellowing, or distorted leaves; sticky honeydew on leaves; presence of sooty mold.
- Management: Spray plants with a strong stream of water to dislodge aphids, introduce beneficial insects like ladybugs or lacewings, or use insecticidal soap or neem oil.
- Spider Mites
- Symptoms: Fine webbing on leaves, stippling or yellowing of leaves, leaf drop.
- Management: Increase humidity around plants, spray with water to reduce mite populations, use insecticidal soap or miticides.
- Leaf Miners
- Symptoms: Winding, discolored trails on leaves.
- Management: Remove and destroy affected leaves, use neem oil or insecticides specifically labeled for leaf miners.
- Whiteflies
- Symptoms: Yellowing leaves, stunted growth, white, powdery insects on the undersides of leaves.
- Management: Use yellow sticky traps to catch adults, introduce beneficial insects like parasitic wasps, apply insecticidal soap or neem oil.
- Thrips
- Symptoms: Silvery streaks or stippling on leaves, distorted flowers, black specks (excrement) on leaves.
- Management: Remove and destroy affected plant parts, use insecticidal soap, neem oil, or introduce beneficial insects like predatory mites or minute pirate bugs.
Diseases
- Powdery Mildew
- Symptoms: White, powdery fungal growth on leaves, stems, and flowers.
- Management: Ensure good air circulation, avoid overhead watering, apply fungicides like sulfur or neem oil.
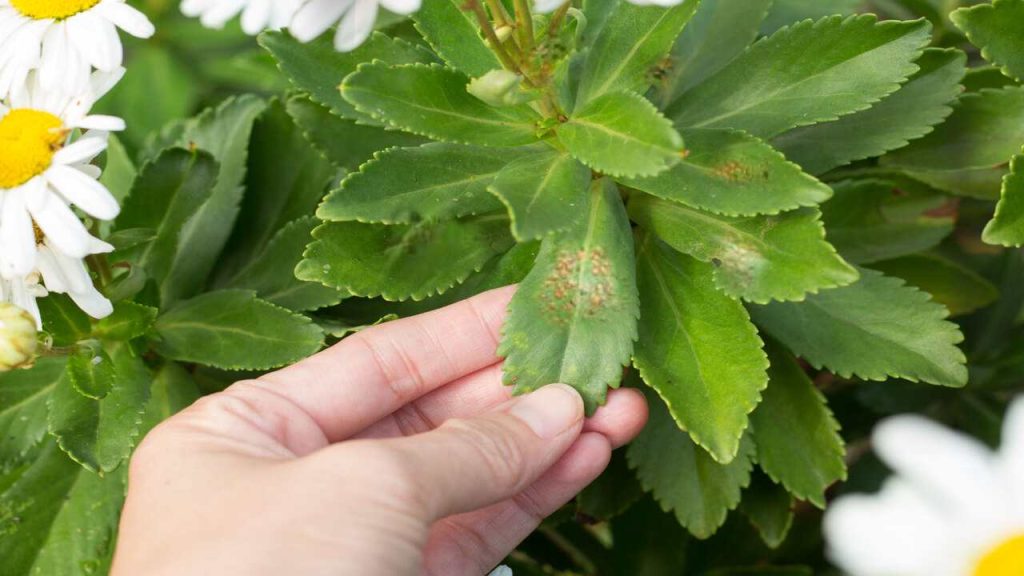
- Leaf Spot
- Symptoms: Brown, black, or tan spots on leaves, often with a yellow halo.
- Management: Remove and destroy affected leaves, avoid overhead watering, apply fungicides if necessary.
- Root Rot
- Symptoms: Yellowing leaves, wilting, stunted growth, blackened or mushy roots.
- Management: Ensure well-draining soil, avoid overwatering, remove affected plants and improve soil drainage.
- Botrytis Blight (Gray Mold)
- Symptoms: Gray, fuzzy mold on flowers, stems, and leaves; browning and wilting of plant parts.
- Management: Improve air circulation, remove and destroy affected plant parts, apply fungicides like chlorothalonil or copper-based products.